Tutorials
These tutorials will take you from zero to hero in building games with GameKit.
Requirements
As mentioned previously, GameKit is a 2D Java game engine which is distributed as a Maven dependency. To use this engine, you must have the following installed and configured:
- Java Development Kit (JDK) and Java Runtime Environment (JRE) (18+)
- A Java IDE (IntelliJ IDEA, Eclipse, Netbeans, VSCode, etc)
- Maven build tool and dependency manager (3.9.9+)
Next, you need to create a Maven Java project and add the GameKit engine to your dependencies.
The GameKit Application
A GameKit application runs a game loop, manages a window and monitors the keyboard and mouse for user input.
To create one, you need to extend the Application class. Then in the main method, create a new instance of your
subclass and call the run() method to launch the game.
import dev.gamekit.core.Application;
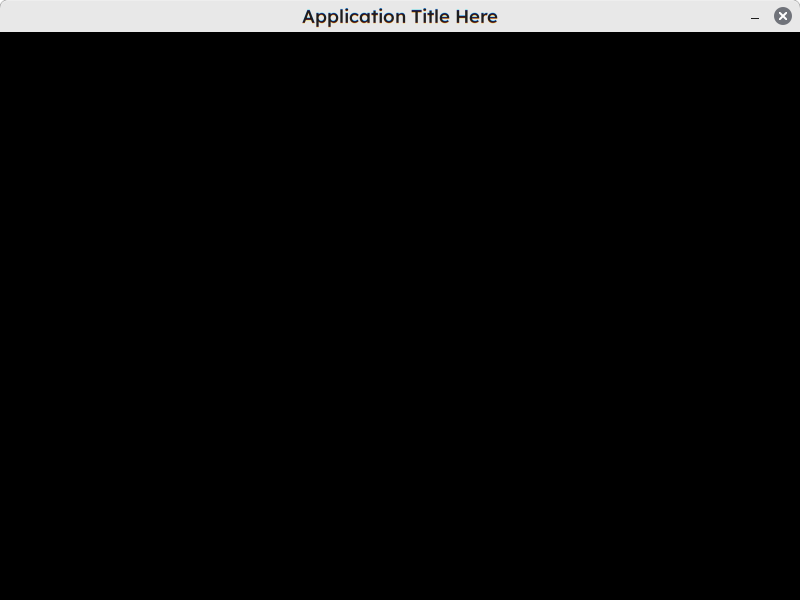
public class Game extends Application {
public App() {
super("Application Title Here");
}
public static void main(String[] args) {
Game game = new Game();
game.run();
}
}
Additional Configuration
The Application class has additional settings which can be configured. To set one or more of these, pass a Settings
object to the Application constructor in any order, as shown below:
import dev.gamekit.core.Application;
import dev.gamekit.settings.*;

public class Game extends Application {
  public App() {
    super(
      new Settings(
        "Application Title Here",
        Resolution.NATIVE,          // Window resolution          (VGA, SVGA, XGA, HD, WXGA, FULL_HD, NATIVE)
        WindowMode.FULLSCREEN,      // Window mode                (WINDOWED, BORDERLESS, FULLSCREEN)
        Antialiasing.ON,            // Image antialiasing         (DEFAULT, ON, OFF)
        TextAntialiasing.ON,        // Text antialiasing          (DEFAULT, ON, OFF)
        AlphaInterpolation.QUALITY, // Color alpha interpolation  (DEFAULT, QUALITY, SPEED)
        ImageInterpolation.BICUBIC, // Image interpolation        (DEFAULT, NEAREST, BILINEAR, BICUBIC)
        RenderingStrategy.QUALITY,  // Overall rendering strategy (DEFAULT, QUALITY, SPEED)
        Dithering.OFF               // Dithering                  (DEFAULT, ON, OFF)
      );
    );
  }

  public static void main(String[] args) {
    Game game = new App();
    game.run();
  }
}
Access The Current Application Instance
When an application is instantiated, it is stored in a static variable within the Application class. Use
Application.getInstance() to get the current running instance of your application from anywhere within your code
to call public methods on it.
Exit Your Application
When your game needs to exit , call the Application.getInstance().quit() method to quit.
Scenes & Entities
A Scene represents a logical part of your game. This can be an intro showing the developers logo on start-up, the main
menu or a level/stage in your game. For your game to do anything useful, a scene must be loaded.
To create a scene, simply extend the Scene class and provide a name to the scene constructor. After creating a scene,
call the loadScene(Scene) method on your application instance to load it.
The loadScene(Scene) method on the Application can be called before the game runs or as the game is running (I.e.
switching scenes)
import dev.gamekit.core.Application;
import dev.gamekit.core.Scene;

public class SimpleScene extends Scene {
  public SimpleScene() {
    super("Scene Name");
  }

  public static void main(String[] args) {
    Application game = new Application("Application Title") { };
    game.loadScene(new SimpleScene()); // <- Load the scene
    game.run();
  }
}
Lifecycle Methods
A typical game consists of some setup phase, an input, update and render loop and a dispose phase (when exiting). This is illustrated below:
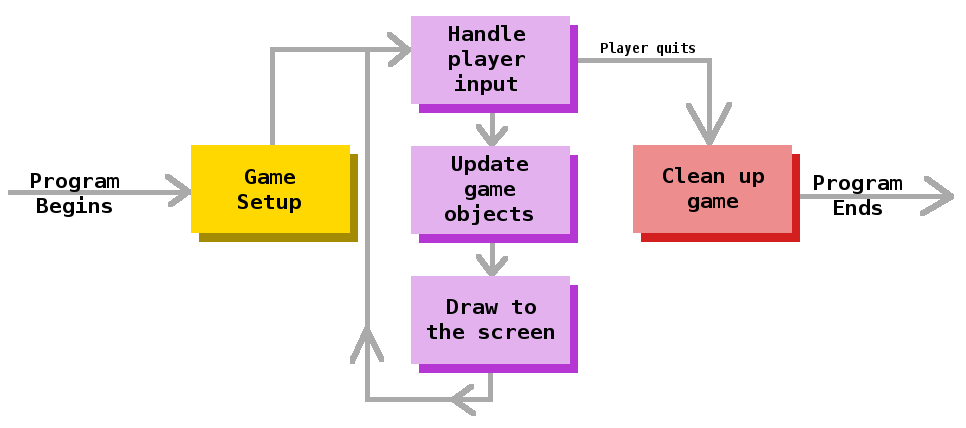
The scene class provides methods for each of these phases that can be overridden to implement the functionality you
need. These methods are called by the Application at different stages.
import dev.gamekit.core.Application;
import dev.gamekit.core.Scene;

public class SimpleScene extends Scene {
  public SimpleScene() {
    super("Scene Name");
  }

  public static void main(String[] args) {
    Application game = new Application("Application Title") { };
    game.loadScene(new SimpleScene());
    game.run();
  }

  @Override
  protected void start() {
    // Called once to set up the scene
  }

  @Override
  protected void update() {
    // Called every frame to update the scene
    // Can be called multiple times per frame due to delays in game loop
  }

  @Override
  protected void render() {
    // Called every frame to render the scene
  }

  @Override
  protected void dispose() {
    // Called once to dispose the scene
  }
}
While these methods are enough to implement the functionality within the scene for simple game ideas, it's generally a good idea to break apart functionality into distinct parts.
Let's take the classic pong game as an example. It consists of a puck, two paddles and the walls and score areas.
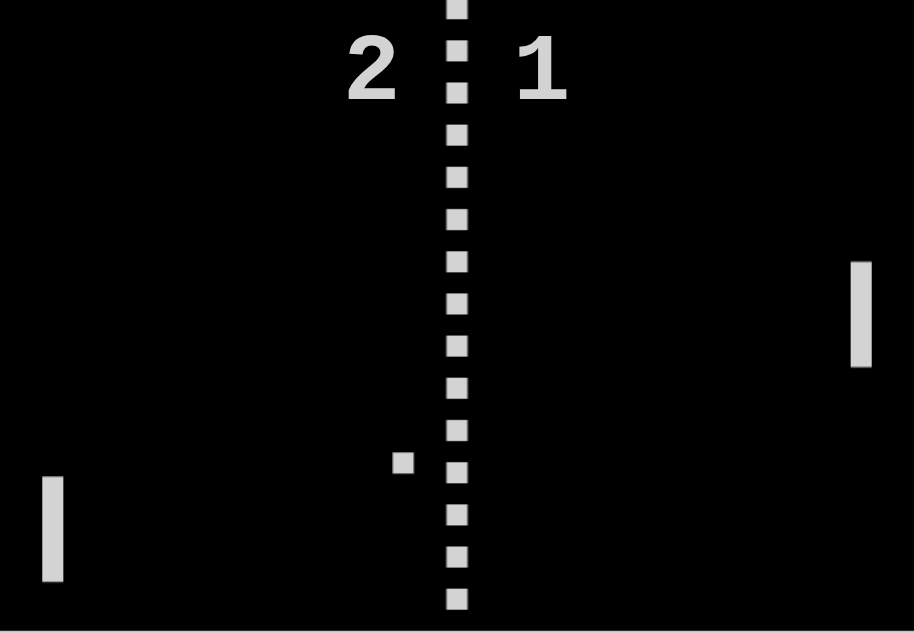
You'd agree with me that while the functionality of all these can be written into a single scene class, it wouldn't be considered good programming practice, since each element has a distinct purpose.
- The puck is the object of focus and bounces around the scene using physics
- The paddles move vertically to deflect the puck and are controlled by players and/or the computer
- The vertical walls keep the puck in the play area
- The score areas register collisions with the puck and increment the scores
It would make sense to split these into different entities and have the scene manage interactions with each other.
This is where the Entity class comes in.
An Entity represents an independent object that exists within a scene/game world. Entities have similar lifecycle
methods as scenes, and are managed by a scene or their parent entities.
Fun fact: A scene is actually a special kind of entity with the ability to render a user interface (more on this later) and is managed by the
Application.
Entity Parents
Both scenes and entities can contain children entities and manage their lifecycle. When a scene is disposed of from the application, or an entity is removed from its scene or parent, all of its children are also disposed of.
Use the addChild(Entity) and removeChild(Entity) methods to add and remove children from scenes/entities
respectively.
Rendering Stuff
A game wouldn't really be much of a game, if you couldn't see anything on the screen. In GameKit, the ability to draw
anything to the screen is handled by the static Renderer class.
Anytime the renderer is used, it adds a draw call to the render queue. Draw calls are objects which instructs the render thread to draw something to the window.
The table below shows all the available methods of Renderer:
| Method | Description |
|---|---|
Renderer.clear |
Clears the visible window area with a color |
Renderer.drawLine |
Draws a line between two pairs of coordinates |
Renderer.drawVerticalLine |
Draws a vertical line between two y-coordinates and an x-coordinate |
Renderer.drawHorizontalLine |
Draws a horizontal line between two x-coordinates and an y-coordinate |
Renderer.fillRect |
Fills a center-origin rectangle |
Renderer.drawRect |
Outlines a center-origin rectangle |
Renderer.fillRoundRect |
Fills a center-origin rounded rectangle |
Renderer.drawRoundRect |
Outlines a center-origin rounded rectangle |
Renderer.fillOval |
Fills a center-origin oval |
Renderer.drawOval |
Outlines a center-origin oval |
Renderer.fillCircle |
Fills a center-origin circle |
Renderer.drawCircle |
Outlines a center-origin circle |
Renderer.drawImage |
Draws a center-origin image |
Renderer.fillPolygon |
Fills a polygon from a point array |
Renderer.drawPolygon |
Outlines a polygon from a point array |
Render Attributes
Draw calls can further be enhanced with attributes which customize their operation. These attributes are defined in the table below:
| Attribute | Method Call | Description |
|---|---|---|
| Color | withColor(Color) |
Sets the foreground color of the draw call |
| Stroke | withStroke(Stroke) |
Sets the border stroke (width and type) of the draw call |
| Paint | withPaint(Paint) |
Sets the paint of the draw call. Paint allows drawing of gradients |
| Clip | withClip(int,int,int,int) |
Sets the clip region of the draw call which prevents drawing outside the specified area |
| Rotation | withRotation(int,int,double) |
Sets the clockwise rotation in radian of the draw call |
Rendering Sample
The sample below is a scene which uses the renderer methods and attributes shown above:
import dev.gamekit.core.Application;
import dev.gamekit.core.IO;
import dev.gamekit.core.Scene;

import java.awt.*;
import java.awt.image.BufferedImage;

public class RendererScene extends Scene {
  private static final BufferedImage IMAGE = IO.getResourceImage("test.jpg");
  private static final int[] POLYGON_POINTS = new int[]{ 90, -190, 110, -110, 50, -99 };
  private static final Stroke DEFAULT_STROKE = new BasicStroke(2, BasicStroke.CAP_ROUND, BasicStroke.JOIN_ROUND);

  public RendererScene() {
    super("Rendering Showcase");
  }

  public static void main(String[] args) {
    Application game = new Application("Renderer Showcase") { };
    game.loadScene(new RendererScene());
    game.run();
  }

  @Override
  protected void render() {
    Renderer.clear(Color.DARK_GRAY);

    Renderer.drawLine(0, 0, 10, 10).withColor(Color.GREEN);
    Renderer.drawVerticalLine(0, -20, -4).withStroke(DEFAULT_STROKE);
    Renderer.drawHorizontalLine(0, 20, 5).withColor(Color.GREEN).withStroke(DEFAULT_STROKE);

    Renderer.drawRect(0, 0, 50, 20); // A 50x20 rect centered at (0, 0)
    Renderer.fillRect(0, 0, 48, 16);

    Renderer.drawRoundRect(50, 50, 75, 20, 4, 4); // A 75x20 rect centered at (50, 50) with horizontal arc radius 4 and vertical arc radius 4
    Renderer.fillRoundRect(50, 50, 75, 20, 4, 4);

    Renderer.drawOval(10, 20, 50, 30); // A 50x30 oval centered at (10, 20)
    Renderer.fillOval(10, 20, 48, 16);

    Renderer.drawCircle(30, 30, 50); // A 50px radius circle centered at (30, 30)
    Renderer.fillCircle(30, 30, 48);

    Renderer.drawImage(IMAGE, 100, 100, 300, 200)
      .withRotation(100, 100, 0.5 * Math.PI); // A 300x200 image centered at (100, 100) rotated by 90 degrees about (100, 100)

    Renderer.drawPolygon(POLYGON_POINTS)
      .withClip(0, 0, 100, 100); // Polygon points cliped to the area defined by top-left (0, 0) and width and height of 100x100
    Renderer.fillPolygon(POLYGON_POINTS);
  }
}
Scene Camera
The static Camera class gives you the ability to pan and zoom around in your game world. This is useful for features
like player/object tracking.
The Camera class is incredibly simple to use. The table below shows all the available methods of Camera:
| Method | Description |
|---|---|
Camera.lookAt |
Positions the camera such that the given coordinates appear in the center of the window |
Camera.setZoom |
Sets the zoom level of the camera |
Camera.screenToWorldPosition |
Converts a point in screen coordinates to a point in world coordinates |
External Assets
While building your game, chances are, you'd need to import images, audio, fonts or other external resources. GameKit
allows you to do this via the static IO class.
Since GameKit is built with Java here, you need to ensure that your external directory is added to the classpath. For Maven projects, this is the
src/main/java/resources/directory which should already be added, however, be sure to check your IDE settings.
IO caches resources it loads, making subsequent queries instantaneous, which improves overall performance of your
game.
The table below shows all the available methods of IO:
| Method | Description |
|---|---|
IO.getResourceStream |
Opens and returns a stream to a resource file |
IO.getResourceImage |
Loads and caches an image resource file |
IO.getResourceFont |
Loads and caches a font resource file |
IO keeps references to any open streams, which it closes when the application exits. While this is convenient, it's
good practice to close streams manually when done.
Handling Input
Detecting player input in GameKit is done using the static Input class. Input detects and gathers keyboard and
mouse inputs to be used during the update phase of the game loop.
Input allows you to check the following states for keyboard keys and mouse buttons:
- Key/Button has just been pressed
- Key/Button is being held
- Key/Button has just been released
The table below shows all the available methods of Input:
| Method | Description |
|---|---|
Input.isKeyDown |
Checks if a key has just been pressed in the current frame |
Input.isKeyPressed |
Checks if a key is being held down |
Input.isKeyReleased |
Checks if a key has just been released in the current frame |
Input.isButtonDown |
Checks if a button has just been pressed in the current frame |
Input.isButtonPressed |
Checks if a button is being held down |
Input.isButtonReleased |
Checks if a button has just been released in the current frame |
Input Sample
The sample below showcases how Input methods are used. When the left mouse button or space bar is pressed, held and
released, it prints out to the console.
import dev.gamekit.core.Application;
import dev.gamekit.core.Input;
import dev.gamekit.core.Scene;

public class InputSample extends Scene {
  public InputSample() {
    super("Main Scene");
  }

  public static void main(String[] args) {
    Application game = new Application("Input Sample") { };
    game.loadScene(new InputSample());
    game.run();
  }

  @Override
  protected void update() {
    if (Input.isButtonDown(Input.BUTTON_LMB)) {
      logger.debug("Left Mouse Button pressed");
    } else if (Input.isButtonPressed(Input.BUTTON_LMB)) {
      logger.debug("Left Mouse Button is being held");
    } else if (Input.isButtonReleased(Input.BUTTON_LMB)) {
      logger.debug("Left Mouse Button released");
    }

    if (Input.isKeyDown(Input.KEY_SPACE)) {
      logger.debug("Space Bar pressed");
    } else if (Input.isKeyPressed(Input.BUTTON_LMB)) {
      logger.debug("Space Bar is being held");
    } else if (Input.isKeyReleased(Input.BUTTON_LMB)) {
      logger.debug("Space Bar released");
    }
  }
}
Working With Audio
This is an introduction to GameKit's audio system. Visit the full documentation here.
Music and sound effects add more life to your game, which improves player immersion. GameKit supports audio playback in a simple yet powerful manner.
GameKit supports both 2D (non-spatial) audio and 3D (spatial) audio.
2D audio is great for background music and UI element feedback, while 3D audio works best for sounds which sound differently depending on their location in your game world. (E.g. camp fireplace and explosions)
The general workflow for audio in GameKit is as follows:
- Preload audio file into an audio clip
- Assign audio clip to an audio group
- Begin/Pause/Stop playback of your clip within your game
The sample below illustrates this process. Here we preload a resource file "sample.wav", then we use the space bar press to start/stop playback.
import dev.gamekit.audio.AudioClip2D;
import dev.gamekit.audio.AudioGroup;
import dev.gamekit.core.Application;
import dev.gamekit.core.Input;
import dev.gamekit.core.Scene;
import dev.gamekit.core.Audio;

public class AudioSample extends Scene {
  private static final String MUSIC_CLIP_KEY = "music";

  private boolean playing = false;

  public AudioSample() {
    super("Main Scene");

    Audio.preload(
      MUSIC_CLIP_KEY,
      new AudioClip2D(
        "sample.wav",
        AudioGroup.MUSIC,
        1 // Max volume (0 - 1)
      )
    );
  }

  public static void main(String[] args) {
    Application game = new Application("Audio Sample") { };
    game.loadScene(new AudioSample());
    game.run();
  }

  @Override
  protected void update() {
    if (Input.isKeyDown(Input.KEY_SPACE)) {
      if (!playing) {
        Audio.get(MUSIC_CLIP_KEY).play();
        playing = true;
      } else {
        Audio.get(MUSIC_CLIP_KEY).stop()
        playing = false;
      }
    }
  }
}
As stated earlier, this is just an introduction to GameKit's audio system. Visit the full documentation here.
User Interface
This is an introduction to GameKit's UI system. Visit the full documentation here.
Almost every game requires a user interface. You know, that overlay of visual components that convey information to the player and also allows the player to interact with the game.
In GameKit, the user interface (UI) is created and managed by the Scene class by overriding the createUI method.
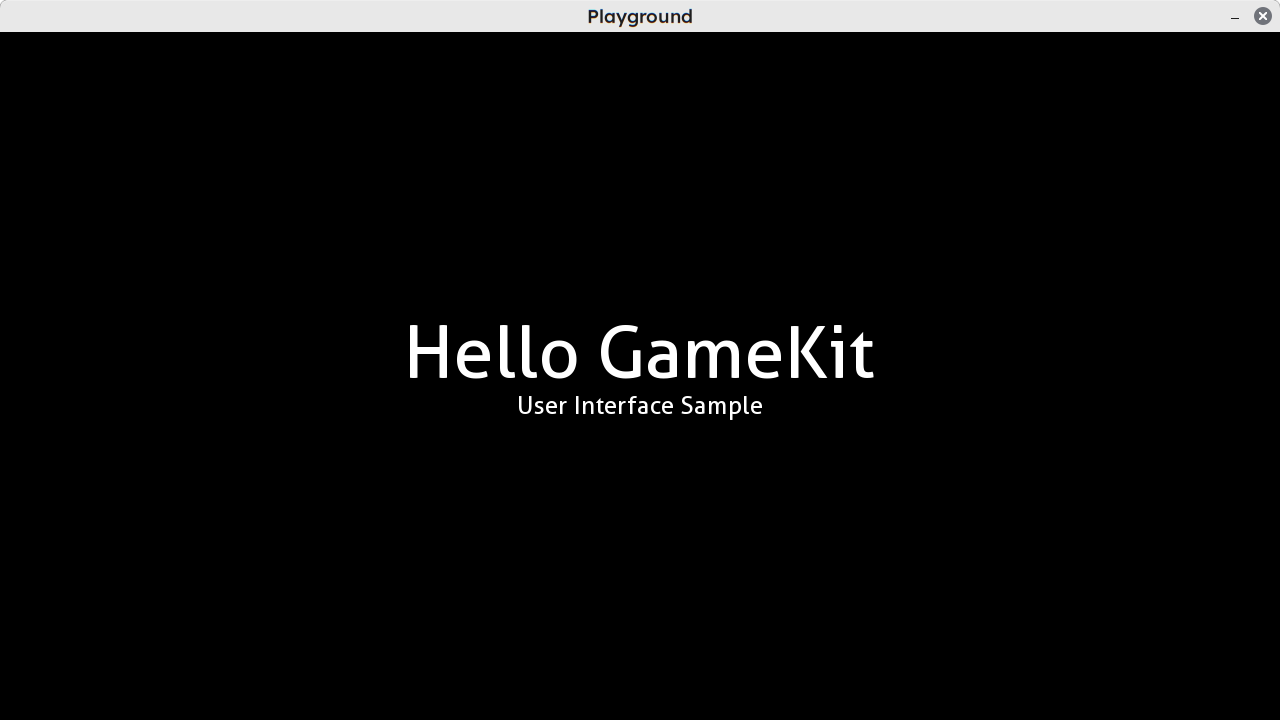
In the example shown below, a center-aligned text widget with text "Hello GameKit" is displayed in the middle of the screen:
import dev.gamekit.core.Application;
import dev.gamekit.core.Input;
import dev.gamekit.core.Scene;
import dev.gamekit.ui.enums.Alignment;
import dev.gamekit.ui.enums.CrossAxisAlignment;
import dev.gamekit.ui.widgets.*;

public class UserInterfaceSample extends Scene {
  public UserInterfaceSample() {
    super("UI Scene");
  }

  public static void main(String[] args) {
    Application game = new Application("User Interface") { };
    game.loadScene(new UserInterfaceSample());
    game.run();
  }

  @Override
  protected Widget createUI() {
    return Center.create(
      Align.create(
        Align.config().horizontalAlignment(Alignment.CENTER).verticalAlignment(Alignment.CENTER),
        Column.create(
          Column.config().crossAxisAlignment(CrossAxisAlignment.STRETCH),
          Text.create(
            Text.config().fontSize(72).alignment(Alignment.CENTER),
            "Hello GameKit"
          ),
          Text.create(
            Text.config().fontSize(24).alignment(Alignment.CENTER),
            "User Interface Sample"
          )
        )
      )
    );
  }
}
The above program, when run, results in the window in the screenshot below:
As you can see, UI creation occurs right in your scene code, not in a separate file you have to import into your code. This keeps things nice, clean and compact.
Again, this is just an introduction to GameKit's UI system. Visit the full documentation here.